Structured Commands
A list of commands that create structures or perform more complex tasks.
Introduction
A structured command simplifies the creation of the more complex elements in OpenDataDSL. A structure generally takes the form:
varname = structure
    (config)*
    (statement)*
end
action
Command to create actions that can be used in workflows
Syntax
varname = (action|gateway) in "category"
  (comment)?
  (actionInput|actionOutput)*
  (actionExit)?
  (statement)*
end

actionInput: in varname as declaredType ("desc")? (optional)?
actionOutput: out varname as declaredType ("desc")?
actionExit: exit "name" (, "name")*
Description
A workflow action is a small block or snippet of code that performs a specific task and can be used in your own custom workflows. They can have input and output data and 1 or more exit transitions which can be configured in a workflow.
Explanation of the syntax
- action or gateway - This command can create actions or gateways:
- An action takes optional inputs, performs a task and creates optional outputs
- A gateway takes an input and based on that input takes a specific exit transition
- The category is a string that is used to place the action in a specific category
- The comment on the first line of the action is used as the description of the action
- Action inputs can have an optional directive
- The action exits are simply string exit names, such as “ok” or “failed”
Examples
A simple send batch action
test_send_batch = action in "loaders"
    // Send a batch of data to the server to be updated
    in batch as Object "The batch to upload"
    exit "ok","failed"

    on error ignore
    send input.batch
    if error
        return "failed"
    else
        return "ok"
    end
end

// Save the action to the server
save ${action:test_send_batch}
An action to read an object from the object service
read_object = action in "general"
    // Read an object
    in id as Scalar "The ID of the object to read"
    out obj as Object "The ODSL Object"
    exit "ok", "failed"

    on error ignore
    output.obj=${object:input.id}
    if error
        print error
        return "failed"
    else
        return "ok"
    end
end
aggregate
Create an aggregation pipeline to group and summarise data
Syntax
varname = aggregate service
  (pipelineItem)*
end

pipelineItem: (pipelineMatch|pipelineGroup|pipelineSort|NL|comment);
pipelineMatch: match (condition)+;
pipelineGroup: group assign (, assign)*;
pipelineSort: sort sortItem (, sortItem)*;
sortItem: (assign|varname (asc|desc)?);
Description
The aggregate command creates an aggregation pipeline to group and summarise data from any service.
Explanation of the syntax
- The match pipeline item allows you to filter out data using a condition clause
- The group pipeline item groups or summarises data using one or more of the following summarising functions:
- count() - counts the number of occurances
- The sort pipeline item sorts the results according to the specified field and asc(ending) or desc(ending) order
Examples
The following example summarises the status of process executions filtered for a specific service
summary = aggregate ${exec}
    match service="ETL"
    group _id="$status", qty=count()
    sort qty desc
end
More about aggregation
find
Used to search the database
Syntax
varname = find
  (top n)?
  (unique field from | profile profilename (for range)? from)?
  (activevar|avservice)
  (where (condition)+)?
  (end)?
Layout
The find command can be used in a single line or multi-line format for better readability, e.g.
// Single line search of private audit records
records = find ${audit} where timestamp > ${date:"today"} and timestamp < ${date:"tomorrow"}

// Multi-line version of the same search
records = find ${audit} where
    timestamp > ${date:"today"}
    and timestamp < ${date:"tomorrow"}
end
Options
top
The top option allows you to find a smaller sample of data, e.g.
// Retrieve the first 15 objects
objects = find top 15 ${object} where dataset="ARGUS_DEL"
unique
The unique option allows you to get a list of unique values for a specific field in a resource
profile
The profile option is only used when searching through objects. It allows you to search objects, but return a list of data objects linked to the object where the profile name matches the passed in profilename. This option also allows you to specify a range, which can be a single date or a range of dates in the following syntax:
- Single date as a Date or a String, e.g. “2021-07-16”
- Single date using the date active variable service, e.g. ${date:”yesterday”}
- From a date, e.g. from(“2021-01-01”)
- The last number of days, e.g. last(3)
- A range of dates using between, e.g. between(“2021-01-01”,${date:”yesterday”})
condition
The condition option is used to filter the results of the find command. The syntax of the conditions is as follows:
expression (<|<=|>|>=|=|==|!=|like|intersects|within) expression
    | condition (and|or) condition
    | ( condition )
####### Examples of conditions
category = "extractors"
timestamp > "2020-11-03T12:23:40"
timestamp > ${date:"today"} and timestamp < ${date:"tomorrow"}
name like "ch"
location within Sphere([ 51.72961, 0.47612 ], 20 / 3963.2)
Description
The find command is a powerful way of searching a resource for the data you require. It returns a virtual list of items that match the specified conditions.
Examples
Find all
In its simplest form, the find command can be used to list all items from a service, e.g.
// Get a list of all public calendars
calendars = find ${calendar:public}
Simple filtering
// Get a list of public actions for a specific category
pactions = find ${action:public} where category = "extractors"
Filtering by date
// Get a list of private audit records for today
records = find ${audit} where timestamp > ${date:"today"} and timestamp < ${date:"tomorrow"}
A list of data using the object profile option
data = find profile SPOT for yesterday from ${object:public} where dataset == "ECB_FX"
Various date range queries
// Data in get query
data = ${data:"#ECB_FX.EURZAR:SPOT"} for ${date:"yesterday"}
data = ${data:"#ECB_FX.EURZAR:SPOT"} for yesterday
data = ${data:"#ECB_FX.EURZAR:SPOT"} for last(3)
data = ${data:"#ECB_FX.EURZAR:SPOT"} for from(yesterday)
data = ${data:"#ECB_FX.EURZAR:SPOT"} for between("2021-05-01",yesterday)
Geospatial
// Define a polygon and search for objects within it
london = Polygon([[51.5386, -0.4956],[51.6445, -0.0753],[51.5205, 0.1753],[51.3479, -0.1163],[51.5386, -0.4956]])
items = find ${object:"TestGeometry"} where location within london
function
Create your own user definable function (UDF)
Syntax
function name ( ((byref)? param (, (byref)? param)*)? )
  (comment)?
  (statement)*
end
Description
The function command allows you to create a custom function which can be used in your OpenDataDSL scripts - either in the same script or you can write functions in a script which can then be imported into a script.
The function is called using the name of the function and the parameters passed in the same order as declared.
To return a value from a function, you need to create a variable in the function as the same name as the function.
Documentation
Any comments that are added above the function becomes the function description visible when hovering over the function when it is called.
Multi-line comments can also include '@ variables' which can describe parameters and information about the script itself:
- @category - when placed in a comment block at the top of the script, this is used as the category for the file which is used in the GUI to provide categorised lists of scripts.
- @param - this is used to provide a description of a function parameter
Parameter modifiers
By default, parameters are passed 'by value', which means that changing those values in the function does not change the variable that was passed in. Adding the byref parameter modifier means that the value is passed 'by reference' so the actual variable itself is passed into the function.
Example of script comment:
/**
 * @category report
 * Functions for creating reports
 */
Example of function comment:
/**
 * Bootstrap an input curve
 * to create a monthly arbitrage-free curve
 * @param input The input curve
 */
Examples
An example that creates a bootstrapped and shaped curve
/**
 * Create an arbitrage free monthly curve from the input curve and use simple shaping
 * @param input The input curve
 */
function bootstrapAndShape(input)
    boot = bootstrapCurve(input)
    bootstrapAndShape = shape(boot)
end
transform
Used in an ETL process to map data from an input format to output objects
Syntax
name = transform inputVariable into (declaredType|object|rows) as varname
  (comment)?
  transformOptions
  transform
end

transformOptions: (transformCreate)? (transformUnique)? (on error ignore)? (transformIgnore)?

transformCreate: create with varname (, varname)* (transformClear)?
transformUnique: unique var=value
transformIgnore: ignore condition (, condition)*
transformClear: clear varname (, varname)*

transform: (assign|method|transformIf|print|comment|NL)*
transformIf: if condition
  transform (elseif condition transform)*
  (else transform)?
end
Description
The transform command creates a transformer that can be used to convert an input object usually read from a file or web URL into one or more output objects
Explanation of the syntax
- The inputVariable is the input object that you want to transform from
- The into declaration can be one of:
- A named public or private declaredType
- A generic object
- A rows object, which is effectively rows or properties like a CSV file or spreadsheet
- The as varname part defines the temporary object variable holding the current value as the input variable is iterated through
- The comment on the first row of the transformer is used as the description of the transformer
- The options section at the top of the transformer can contain the following:
- create - this defines which column or property name in the input variable which when the value changes defines what creates an output object, e.g. if there is a name property in the input variable which is different for each element that you want to create an object for you would use the option: create with name.
- clear - this works with create and allows you to clear some property values in between creating a new object, this means that you don’t get properties repeating from other objects if their value isn’t supplied.
- unique - this defines the unique id for the output variables and enables you to concatenate properties and clean up vairable names etc.
- on error ignore - this allows the transformer to complete ignoring and transformation errors - sometimes this is necessary when formats cause execution errors
- ignore - this allows you to skip elements that match any supplied condition, for example if a proeprty is null which would cause issues you can specify that condition here
- create - this defines which column or property name in the input variable which when the value changes defines what creates an output object, e.g. if there is a name property in the input variable which is different for each element that you want to create an object for you would use the option: create with name.
Examples
The following example creates a transformer and then runs the transformer using input data from an xml file on the ECB web site.
// Create the transformer
ECB_FX = transform xml into #ForeignExchange as fx
    create with Cube
    unique id = "ECB\_FX\_EUR" + fx.currency
    SPOT = TimeSeries(xml.Cube.Cube.time, "BUSINESS", fx.rate)
    category = "Foreign Exchange"
    product = "ECB_FX"
    provider = "European Central Bank"
    model = "EUR" + fx.currency
    description = "European Central Bank Euro FX rates EUR/" + fx.currency
    base = "EUR"
    currency = fx.currency
end

// Test
xml=${xml:"https://www.ecb.europa.eu/stats/eurofxref/eurofxref-daily.xml"}
models = ECB_FX.run(xml)
for model in models
    print model.id
next
The following example shows some static JSON content being transformed in 2 different ways and also introduces using metadata to decorate the output results.
// The static input JSON
json = `{
    timestamp: "12Oct2020",
    data: \[
        {
            identity: "A",
            value: 1.2
        },
        {
            identity: "B",
            value: 1.5
        },
        {
            identity: "C",
            value: 999
        }
    \]
}`

// Convert to an object
input = ${json:json}

// Create a type to convert the JSON into
example = type
    name as String()
    description as String()
    value as Scalar()
end

// Create some metadata to decorate the output data
metadata = Object()
metadata.A = "A description"
metadata.B = "B description"

// A transformer to convert the JSON into the example type
tx = transform input into example as x
    create with data
    unique name = x.identity
    on error ignore
    ignore x.identity == "C"
    name = x.identity
    description = metadata.get(x.identity)
    value = x.value
end

// Run the transformer and output the results as JSON
result = tx.run(input)
print json(result)

// Another transformer that outputs the results as rows
rowtx = transform input into rows as x
    create with data
    unique name = x.identity
    on error ignore
    ignore x.identity == "C"
    name = x.identity
    description = metadata.get(x.identity)
    value = x.value
end

// Run the transformer and print out the results and size of the results
rowresult = rowtx.run(input)
print json(rowresult)
print rowresult.size
type
Create a custom data type for your private data
Syntax
declaredType = (versioned)? type (extends declaredType)?
  (comment)?
  (typeProperty | typeExpression | typeMethod )*
end

typeProperty: propertyName as type ( (qualifier)? )
  (matches regex)?
  (default defaultValue)?

typeExpression: propertyName as expression

typeMethod: propertyName as function( (param (,param)*)? )
  functionBody
end
Description
An explanation of the syntax:
- declaredType is the id of the type
- The versioned option makes all objects of this type versioned
- The extends option allows you to extend another type, creating a specialisation of that type
- The comment on the first line after the declaration becomes the description of this type
- A property on the type can be one of:
- property
- expression
- method
- The type of the property can be one of:
- dimension - This is a special property type that is used by GUI applications, e.g. the web portal to filter objects based on a value of this property. A dimension is generally used as a property that has a very low uniqueness, e.g. like country or source
- string - A simple string property
- number - A generic number, can be integer or decimal
- scalar - A generic scalar value, can be string, numeric or boolean
- date - A date or datetime value
- boolean - A true/false value
- list - A list of objects - the type of object can be restricted using a qualifier
- object - A generic object
- duration - A timespan value, e.g. 4 days
- geometry - A geometric shape
- timeseries - A timeseries value
- curve - A curve value
- specific type - Any public or private type declaration
- The property can have a qualifier used to limit the type, e.g. if the type is a list and you want to restrict the list elements to dates
Versioning
If you specify the versioned option when defining the type, then all objects of this type will be versioned. This means any updates to that object where a value of a property has changed will cause a new version to be created and the existing version is archived. More details about data versioning can be found here.
Extending
By default, all types extend the #Object type which has the following properties defined:
- name - string
- description - string
- classification - dimension
- geolocation - geometry
However, you can elect to extend any public or your own private type in order to create a specialised version of that type, which will give you a type hierarchy. A simple example of why you would want to do this is shown below:
Type Hierarchy
The diagram below shows a simple type hierarchy, starting with #Object we create a generic Person type which adds the properties PhoneNumber and Email. We then extend the Person object into 2 specialised types: Student and Professor which add some more specific properties.
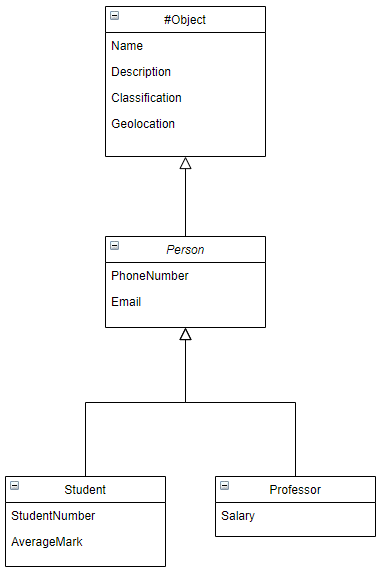
With this type hierarchy, we can add Student objects and Professor objects, but we can also list all Person objects showing all students and professors, so if I knew someones email address and seached in Person, it would find the person irrespective of whether they are a student or a professor.
For more examples and in-depth descriptions, see the section Data Modelling.
Examples
Example of a type hierarchy:
Widget = versioned type
    price as Number()
end

Cable = versioned type extends Widget
    length as Number()
end

Switch = versioned type extends Widget
    ports as Number()
end
workflow
Create a workflow
Syntax
varname = workflow IN "category"
  (comment)?
  (actionInput|actionOutput)*
  (actionExit)?
  workflowStart (phase|workflowEvent|NL|comment)*
end

workflowStart: WF_START
  workflowTransition
end
workflowBody: (workflowEvent|workflowAction|workflowGateway|workflowWorkflow)
workflowEvent: WF_EVENT varname AS "string"
  (assign|comment|returnstmt|workflowTransition)*
end
workflowAction: WF_ACTION varname input
  (assign|comment|workflowTransition)*
end
workflowGateway: WF_GATEWAY varname input
  (assign|comment|workflowTransition)*
end
workflowWorkflow: WF_WORKFLOW varname input
  (assign|comment|workflowTransition)*
end
workflowTransition: "name" -> connection

// Workflow phases
phase: phase "name" (retries INT)? (delay INT TIMEUNIT)? (then reschedule)? (external)?
  (statement|workflowBody)*
end
reschedule: reschedule INT TIMEUNIT
fail: fail expression
abort: abort expression
Description
The configuration of a workflow is best done using the workflow GUI in the web portal (Not available yet), but it can also be done in OpenDataDSL code.
Anatomy of a workflow
A workflow has some input, output and exit configuration at the start - just like an action. The input information is passed in via a process or as an object if running the workflow manually.
Workflow Blocks
All workflows have building blocks in them:
- WF_START - There must be exactly 1 of these, which indicates the start point and it only contains a transition which is the first workflow element that is called
- WF_ACTION - This is a block which configures a workflow action. You can:
- define the action transition routing, i.e. the route to take given the transition information when the action completes
- assign the action input variables from the workflow input or any previous action outputs
- run the action using the input variables
- WF_GATEWAY - This block configures a workflow gateway. It is configured in the same way as an action block and is generally used to route workflows according to an expression
- WF_WORKFLOW - This block configured a sub-workflow, it is configured in the same way as an action - NOTE than any workflow can be used as a sub-workflow
- WF_EVENT - This is generally used as an end point of a workflow and is used to return the transition information back to the calling application.
Workflow Phase
A workflow can nest its WF_ACTION, WF_GATEWAY and WF_WORKFLOW blocks in a phase.
It is recommended that you use phases in a workflow for the following reasons:
- It breaks a workflow into distinct sections which get reported in real-time whilst the workflow is executing
- It allows you to time sections of the workflow
- Each phase allows for custom configuration of retries, retry delay and rescheduling
Examples
wf_xml_extract = workflow in "data-loaders"
    // Extract some data
    in url as Scalar
    exit "success", "failed"

    WF_START
        "ok" -> act_extract_xml
    end

    phase "EXTRACT"
        WF_ACTION act_extract_xml ai
            "ok" -> stopok
            "failed" -> stopfailed
            ai.url = input.url
            result = ${action:"#extract_xml"}.run(ai, output)
        end
    end

    WF_EVENT stopok as "success"
        return "ok"
    end
    WF_EVENT stopfailed as "failed"
       return "failed"
    end
end
As a line-by-line breakdown of this workflow
- Define a workflow called wf_xml_extract in the category data-loaders
- Set a description for this workflow
- Define an input variable called url which is a Scalar
- Define exit transitions for the workflow as success and failed
- Define the workflow start point
- Transition to the action named act_extract_xml (the transition name is ignored)
- Define a workflow phase called EXTRACT
- Define an action block called act_extract_xml with an input variable called ai
- Route the “ok” transition to stopok
- Route the “failed” transition to stopfailed
- Set the url on the action input to be the input url (passed in by the process)
- Run the #extract_xml action passing in the ai variable and the global output variable
- Define the stopok event as a success transition for the whole workflow
- Define the stopfailed event as a failed transition for the whole workflow