Data Modelling
This guide explains how to create your own data models, load data into them and utilise them in processes and reports
Introduction
If you have read the section on variables, you will see that we have a lot of built-in data types which allow you to model your data exactly the way you want it, especially using the dynamic and flexible Object variable.
Data Modelling certainly benefits from dynamic flexibility, but it also requires the ability to define certain fixed information in order to categorise, classify or annotate your data sets and make them searchable and browseable.
This section walks through how you can create your own custom data types, create objects from these types, create relationships between the objects. We will then search, browse and use these objects with plenty of code examples.
Naming conventions
In OpenDataDSL, you can have both public and private data and objects, so it is important to understand how you reference these in your scripts and objects.
If an id is prefixed with a '#' character denotes that an object is public - which is available to everyone. If not, then the object is private - which is visible only to users within your own tenancy.
Below is an example of how this works with types and objects
// private type
pritype = ${type:"Person"}
// public type
pubtype = ${type:"#Location"}
// private object
johndoe = ${object:"JohnDoe"}
// public object
gb = ${object:"#LOC_GBR"}
Types And Objects
A type in ODSL is a structure of properties, expressions and methods which are shared amongst any objects that are created from it.
Root type
Certain properties are present on all types - these properties are defined on the root type known as #Object and are as follows:
{
  "name": "String",
  "description": "String",
  "classification": "String",
  "geolocation": "Geometry"
}
Property types
As you can see from the root type, each property has a type, properties can be:
- A primary type:
- String
- Date
- Boolean
- Number
- A special type:
- Dimension - a special string which can be used for filtering data
- Geometry - used to define a point or shape for geo-spatial mapping
- Duration - a duration of time
- list - a list of array of other types
- object - a generic object
- A data type:
- TimeSeries - a list of values mapped against date/times
- Curve - a forward curve used for contract deliveries and forecasts
- Any other defined type
Creating types
A type can represent any real or virtual thing, but for our example throughout this guide, I will use things around a business that we might want to make a record of, such as companies, offices, employees, computers and other assets that we would like to track.
So let’s start off with a simple company type:
// Declare a type Company
Company = type
    name as String()
end
An explanation of the the above code:
Company = type
This starts the creation of a new declared type called Company
name = String()
This adds a property called name of type String to the Company type
end
The ends the creation of the company type
Let’s add a new address type:
// Declare an address type
Address = type
    street as String()
    area as Dimension()
    city as Dimension()
    county as Dimension()
    country as Dimension()
    postcode as String()
end
You can see that we have now created an Address type and added 6 properties of an Address.
4 of the properties we created as type Dimension, this is a special type of string property that indicates that you will want to filter objects of this type by that property.
Defining a property as Dimension informs user interfaces to generate a filtered list of possible options for this property when browsing for data. We would usually not define Dimension properties that are ‘usually unique’.
Objects (Master Data)
We can create objects from these types using the object as creation syntax as follows:
// Create a company
ABC = object as Company
    name = "ABC Ltd"
end

// Create an address
ABCLondon = object as Address
    street = "123 Abacus Street"
    area = "Westminster"
    city = "London"
    county = "Greater London"
    country = "England"
    postcode = "SW1 1AB"
end
Object IDs
The ID of an object or master data is the variable name you give it. If you want to use a more complex ID, i.e. with dots in it, set the id using the id property, e.g.
obj = object as Company
  name = "My Company"
end

obj.id = "MY.COMPANY"
Inspecting objects
To take a look at what our object looks like, use the print statement:
print ABC
This displays the following:
{
  "name": "ABC Ltd"
}
Similarly for the address:
print ABCLondon
Produces the following:
{
  "area": "Westminster",
  "city": "London",
  "country": "England",
  "county": "Greater London",
  "postcode": "SW1 1AB",
  "street": "123 Abacus Street"
}
Adding non-type-defined properties
When creating an object from a type, we can also add any other variables onto the object that have not been defined on the type, e.g. in the following example, we add a name property:
// Create a minimal address with a non-type-defined name property
ABCNewcastle = object as Address
    name = "Newcastle Address"
    city = "Newcastle"
end
You can add more complex data types, such as TimeSeries or Curves dynamically too:
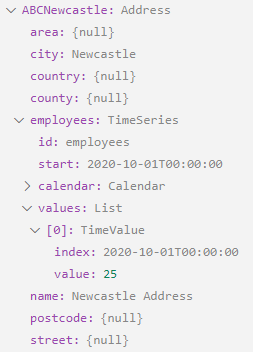
// Create a minimal address with a non-type-defined name and a TimeSeries property
ABCNewcastle = object as Address
    name = "Newcastle Address"
    city = "Newcastle"
    employees = TimeSeries("MONTHLY")
end

ABCNewcastle.employees.add("2020-10-01", 25)
If you place a breakpoint in the code just after this, then you can see the variable we have created:
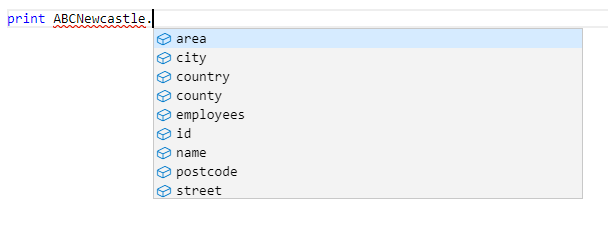
We can directly access the properties also and the editor prompts us with the available properties, including the non-type-defined ones:
Adding matching expressions
You can improve the quality of data entry by adding matching expressions on properties which validate the data entered. The matching expression is a regular regex expression as can be shown in the creation of a person type below:
Person = type
    // A person
    first as String()
    last as String()
    dob as Date()
    email as String() matches "^(\[a-zA-Z0-9_\\-\\.\]+)@(\[a-zA-Z0-9_\\-\\.\]+)\\.(\[a-zA-Z\]{2,5})$"
end
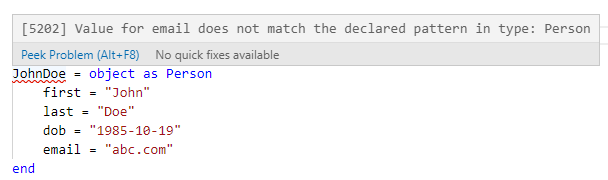
If we now create a person from this type with an invalid email address, you can see in the editor it highlights that the object is in error because the email address given does not match the patter we have defined and the object variable does not get created.
Adding expressions
Expressions can be added to types to add on-the-fly data calculations and reduce repetition of data entry. For example, we can add a name expression to our person that concatenates the first and last name properties to produce a full name:
Person = type
    // A person
    first as String()
    last as String()
    name as first + " " + last
    dob as Date()
    email as String() matches "^(\[a-zA-Z0-9_\\-\\.\]+)@(\[a-zA-Z0-9_\\-\\.\]+)\\.(\[a-zA-Z\]{2,5})$"
end
If we create our JohnDoe object as follows and print out the name:
JohnDoe = object as Person
    first = "John"
    last = "Doe"
    dob = "1985-10-19"
    email = "johndoe@abc.com"
end

print JohnDoe.name
It produces the following output:
John Doe
We can also add expressions to data types other than String, e.g. add this property to the person type
age as (Date() - dob).years
This will calculate how old the person is today in years
Saving types and objects
To store our work to the database, we need to use the active variable services for types and objects. This is done using the save command:
You can save types and objects implicitly or explicitly, there is no difference between the 2 methods shown below
// Save the types

// Implicit save - service is determined by the variable type
save Company

// Explicit save using the service name
save ${type:Address}
save ${type:Person}

// Save the objects

// Implicit save - service is determined by the variable type
save ABC
save ABCLondon

// Explicit save using the service name
save ${object:ABCNewcastle}
save ${object:JohnDoe}
Querying Data
We have 2 methods of getting data into our session:
- Directly assign an object to a variable using the Object Service and the object id
- Search for objects using the find command on the Object Service
Direct assignment
If we know the id of the object to retrieve, we can directly retrieve the object from the service as follows:
jd = ${object:"JohnDoe"}
This uses the object service to retrieve the object with id JohnDoe and assign it to an object variable named jd.
Searching for data
We can use the find command on the Object Service to retrieve a list of objects that match the criteria we specify.
people = find ${object} where first="John" and last="Doe"
print people
The people variable above is a List of person objects, as shown below:
[
{
  "_id": "JohnDoe",
  "_type": "Person",
  "_links": {},
  "dob": "1985-10-19",
  "email": "johndoe@abc.com",
  "first": "John",
  "last": "Doe"
}
]
Adding a custom data type to a type
In our example of a person type, we could directly add a reference to an address type to re-use the address type structure as follows:
Person = type
    // A person
    first as String()
    last as String()
    name as first + " " + last
    dob as Date()
    age as (Date() - dob).years
    email as String() matches "^(\[a-zA-Z0-9_\\-\\.\]+)@(\[a-zA-Z0-9_\\-\\.\]+)\\.(\[a-zA-Z\]{2,5})$"
    address as Address()
end
In the above example, we have added an address property as type Address() which relates to our user defined type ‘Address’.
You can see in the example code below, how we can now access the address property by first creating it as an object as type Address:
JaneDoe = object as Person
    first = "Jane"
    last = "Doe"
    dob = "1987-07-11"
    email = "janedoe@abc.com"
    address = object as Address
        city = "Newcastle"
    end
end
We could also assign an already created address to the property, e.g. :
JaneDoe = object as Person
    first = "Jane"
    last = "Doe"
    dob = "1987-07-11"
    email = "janedoe@abc.com"
    address = ABCNewcastle
end
NOTE: this will create a copy of the ABCNewcastle object, any changes made to this object from now on will not be reflected in JaneDoe’s address.
In order to create a reference to another object rather than copying the values from an object as we saw previously, we have to reference the active variable reference for this object in a ref function as follows:
JaneDoe = object as Person
    first = "Jane"
    last = "Doe"
    dob = "1987-07-11"
    email = "janedoe@abc.com"
    address = ref(${object:"ABCNewcastle"})
end
This is a useful way of creating independent shared information.
Creating Relationships
Extending upon the ability to create shared information, you can create a link between 2 objects in a 2-way relationship. For example, using JaneDoe in the previous section, if we wanted to know both where she lived and conversely, who lived at that address.
The link syntax is as follows:
link A as type\[/childType\] of B
- The A and B are objects in active variable notation
- The type is the relationship name when viewed at the A end (or both if childtype is not specified)
- The optional childtype is the relationship name when viewed from the B end
We can create a link between JaneDoe and ABCNewcastle as follows:
link ${object:"ABCNewcastle"} as address/residents of ${object:"JaneDoe"}
This creates a 2-way relationship between the Person object and the Address object as shown below:
