Getting started with ODSL
Ease your way into programming in ODSL with a simple tutorial that walks through the language basics
Pre-requisites
If you haven’t already done so, download and install Microsoft VS Code and our ODSL Extension in order to make editing and debugging ODSL files easier
Hello World
Every self-respecting tutorial must start with a simple hello world program - so here it is:
print "Hello World"
This simple one-liner will print the text Hello World to the output console.
Introducing Variables
ODSL is untyped, this means you don’t need to declare the type of the variable when creating it.
The easiest way to create a variable is to assign a value to it:
name = "ODSL"
print "Hello " + name
In the above code example, we have created a variable called name and assigned the string “ODSL” to it. We then use that variable in our print statement to produce the output string Hello ODSL.
Debugging
Debugging allows you to step through code checking to see what happens to the variables as the code is run. In VSCode, if you put a breakpoint in the above code on the line to print “Hello “ + name, we can inspect the name variable as shown below:
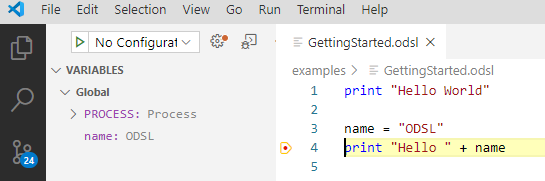
You can see there are 2 variables in the Global scope:
- PROCESS
- name
You can see the name variable with the value ODSL
Variable scopes are covered in a later section
The PROCESS variable will be covered later on when we run workflows, processes and scripts
Control Statements
Most modern standard programming languages have some programming control statements in order to control the execution flow and ODSL is no different, so let’s explore them.
Looping and iterating
You can loop through a sequence of numbers or iterate though a list of variables using a for statement, so imagine we simply want to loop through 10 numbers and print them to the output console, this is achieved as follows:
for i = 1 to 10
  print i
next
This code will print out the numbers 1 to 10 in the output console
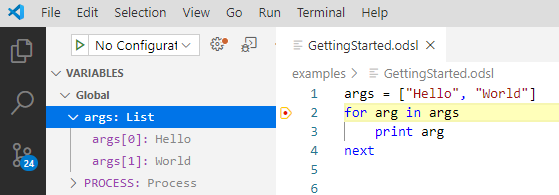
You can also iterate through a list or array or variables using a for statement:
args = ["Hello", "World"]
for arg in args
    print arg
next
Notice how we construct an array using square brackets ‘[' and ']’.
See how this looks in the debugger:
Condition statements
If this is true?
A condition statement routes the code execution according to the condition outcome and an if statement is used to check this.
Extending our looping example, we can add a condition to change the output:
for i = 1 to 10
    if i > 5
        print i
    end
next
Now the output will only show the number 6 to 10
We can also check for multiple conditions using the elseif command:
for i = 1 to 10
    if i > 5
        print i
    elseif i == 3
        print "Three"
    end
next
This will now output the word “Three” when i is equal to 3
Notice the check for equality that uses ==, this distinguishes the check from an assignment which is a single = sign
We can also add a ‘catch-all’ else statement for any other values not falling in the other conditions:
for i = 1 to 10
    if i > 5
        print i
    elseif i == 3
        print "Three"
    else
        print "Something else"
    end
next
The output from this snippet of code is:
Something else
Something else
Three
Something else
Something else
6
7
8
9
10
Note that the else statement has to be the last part of the if condition
While this is true
Another conditional control statement is the while command, this combines the looping of a for statement with the conditional flow of an if statement.
x=5
y=10
while x < y
    x = x + 1
    print x
end
In this code snippet, we initialise 2 variables x and y with the values 5 and 10 respectively.
We then enter the while loop testing the condition that x is less than y.
The statements in the loop will execute once and the condition is tested again.
This continues until the condition is false.
Beware that the while control statement can go into an endless loop: e.g. the following code doesn’t change the value of x, so it will never be less than y
x=5
y=10
while x < y
print x
end
Comments
In order to make the code more readable for everyone else, you can add comments into the code, these can be line comments and multi-line comments:
Line comments
// This is an array
args = ["Hello", "World"] // A comment on the same line
Multi-line comments
/*
    We need to loop through the
    array and print it out
*/
for arg in args
    print arg
next
Comments are ignored when the program is run
Regions
You can create regions within your code that can be run and debugged independently.
A region looks like this:
//#region My region
print "Hello World"
//#endregion
You can easily create a region by typing region and select the offered snippet:

To debug a region, right-click anywhere in the region and select Debug Region from the context menu.